अपने निर्माण प्रणालियों में पुन: होने वाले दोषों से निपटना
As we know when we solve a problem, all the activities carried out must bring out good results. Otherwise, we must have either attacked wrong issues or applied wrong method/tools or lack of rigor in application or lack of pace, this then brings about the re-occurrence of defects, these are the problems manufacturing industries face as well as other industries, which is becoming a norm, below are 2 questions this study answers.
- Why do defects occur?
- Why do they reoccur even after a “root cause has been concluded”?
Defects occur because for the following reasons:
- There are no perfect systems
- Poor designs
- Manual interface
- Defined processes not followed etc.
Why do they occur after a problem has been supposedly closed or “root cause” identified?
- The fact that results are not checked after closures.
- A robust root cause analysis was not done.

Click Here to Download Readymade Editable Toolkits & Templates on Quality Assurance/Quality Control, Lean Six Sigma, Lean Manufacturing, Six Sigma, ISO 9001, ISO 14001, ISO 22000, ISO 45001, FSSC 22000, HSSE, Project Management etc.
For the purpose of this study we would be looking at Checking Results
Results checking is one very important step in problem solving that is usually underrated yet the most important, you will never be sure you got your root cause correctly if you don’t check results from your problem solving.
Why Check results
- To be sure you have the right root cause.
- To close out the defect or problem “Defect re-occurrence affects manufacturing cost”.
- To evaluate the achieved results against the original objectives.
- To know what part of the process or equipment to improve or tweak.

Click Here to Download Readymade Editable Toolkits & Templates on Quality Assurance/Quality Control, Lean Six Sigma, Lean Manufacturing, Six Sigma, ISO 9001, ISO 14001, ISO 22000, ISO 45001, FSSC 22000, HSSE, Project Management etc.
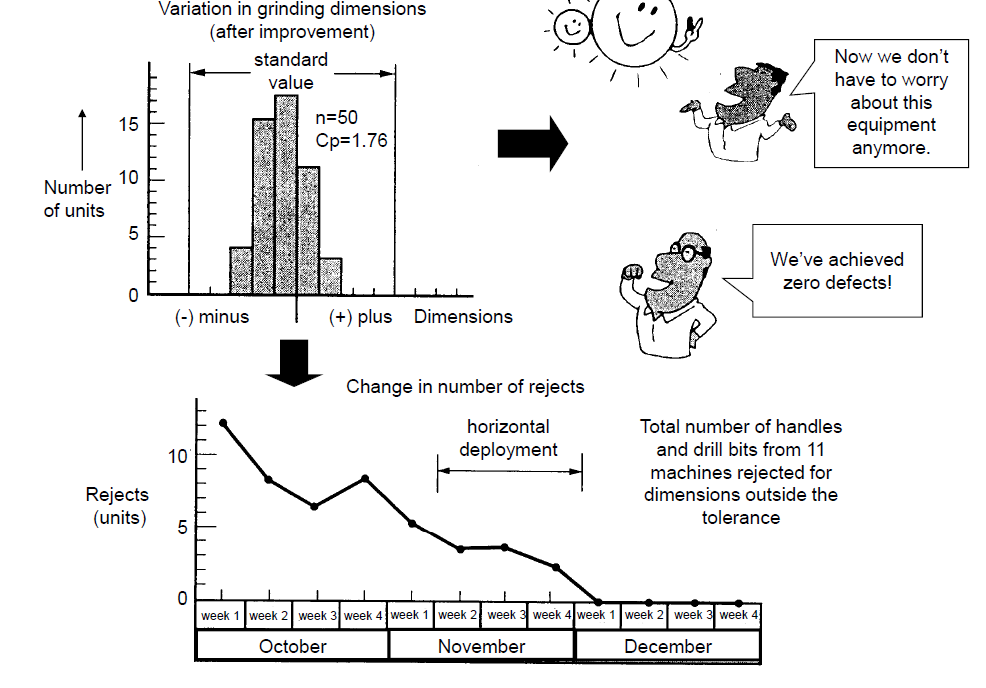
After you have completed all countermeasures defined in your plan, it is important to confirm the effect of the countermeasure you have implemented, this involves gathering data from the solved process, one smart way of making solutions visible is making it pictorial (graphical I mean), plot the data you gathered and cross check with results you had before you implemented the countermeasures, this will give you an idea if the data checked and calculated can be used for future control, also if we have to revisit our countermeasure plan and redefine them.
If your investigation has revealed an improved manufacturing process at a satisfactory state, this should be used continuously used for the future control of your production process.
Also note that as you check your results it gives you an indication whether your process or equipment needs to be tweaked. The below is a pictorial to show how results should be checked using various QC Tools, how they are tracked, it also shows the decision made after results were checked.


Picture Reference: Dr. H. Yamashina, Professor Emeritus, Kyoto University, Fellow of RCA (The U.K.), Member of Royal Swedish Academy of Engineering Sciences.
Dominic is a process & quality consultant with over 10 years’ experience leading various continuous improvement in world-class organizations. founder of Doruem Process Services and Co-Founder to Nodal Point Engineering, with core competence in manufacturing excellence and digital manufacturing.
You can reach him on LinkedIn here.
